5 “Laws” for Drawing Better Figures

I’m not a big fan of “laws” in drawing and painting. There’s an exception to every rule, so it seems that whenever I tell a student that x is “always true”, there ends up being some damn reason why it’s actually not true in the particular case at hand – and then I have to backpedal.
But still, principles can be helpful when you’re learning to draw and paint. Even if x isn’t “always true”, it’s good to know if it’s often true. Knowing what we can expect to see, and why we can expect to see it, can lead to more astute observations and better decisions while drawing.
A good teacher can give you these principles. For me, such a teacher was the late Martha Mayer Erlebacher at the New York Academy of Art. Her singular strength as an instructor was her insistence on absolutes. She taught us that basic human anatomy isn’t really a matter for interpretation. The important stuff is largely the same from one person to the next, and she gave us 5 “Laws” that helped us to draw figures that looked convincing.
These “Laws” aren’t about the names of bones and muscles, but are instead general principles governing the arrangement and expression of structures on the body. They qualify as “Laws” because they’re universal – they apply roughly equally to every individual, and every part of every individual. We can see them at work globally throughout the figure.
Below is an accounting of Martha’s Laws, at least to the best of my recollection.
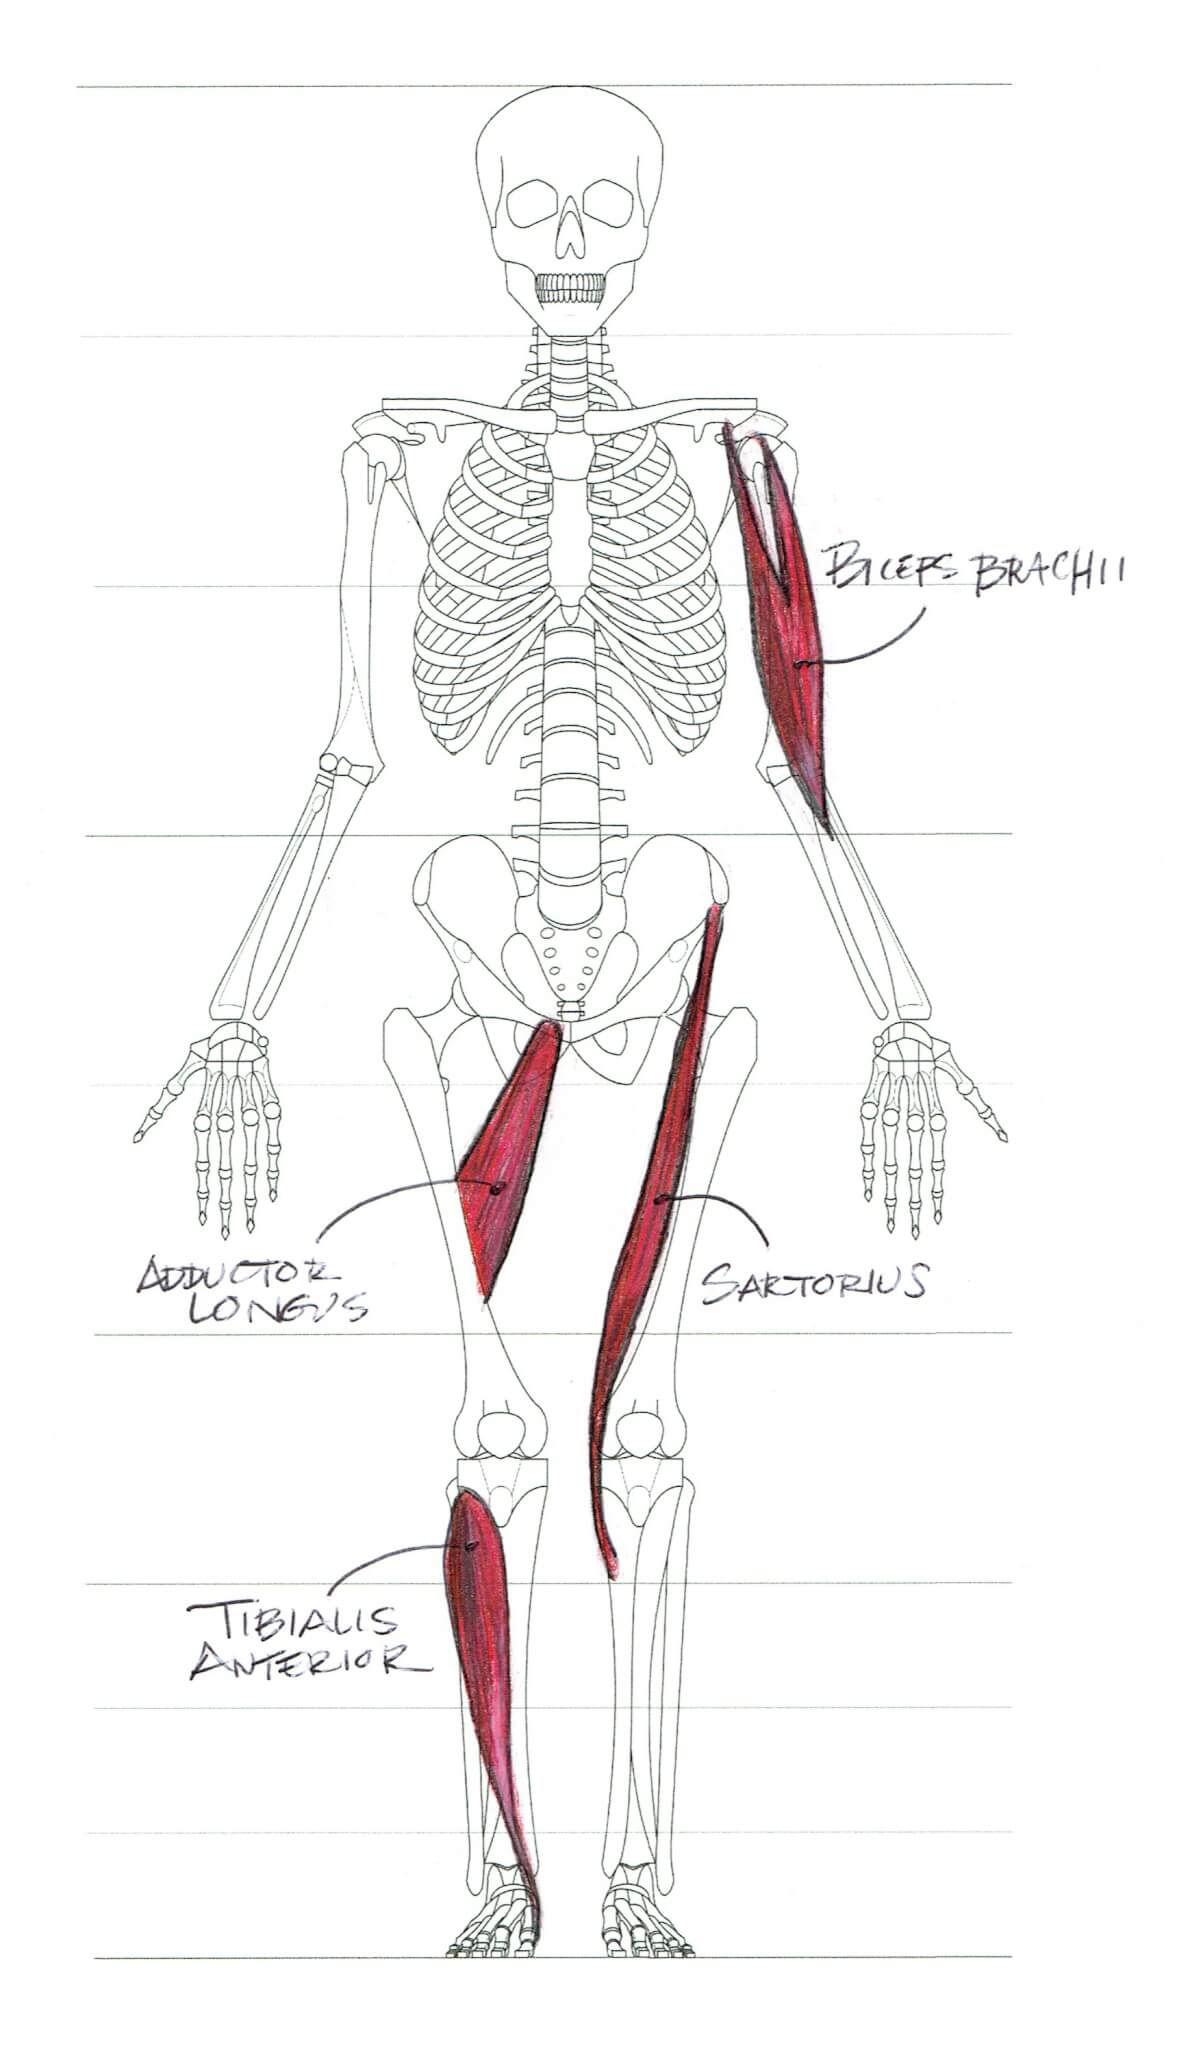
1. The Law of the Diagonal
Every muscle on the body crosses at least one joint. The biceps, for example, crosses two joints on the arm: the shoulder (long head) and the elbow. On its path from end to end, the muscle itself is oriented at a slight angle relative to the long bone of the upper arm – the humerus. The biceps starts near the inside of the arm at the shoulder (medial), and passes toward the outside of the arm at the elbow (lateral) – it’s at a diagonal relative to the long axis of the arm itself. This diagonal relationship between a muscle form and the larger stucture on which it sits can be seen everywhere on the body. Look for it.
2. The Law of the Overlap
The human body is a 3-dimensional entity. Depending on your angle of view, particular volumes will eclipse others, which in turn eclipse still others. Noting the particular “stacking order” of form, and representing it with overlaps in the contour, is a simple way to convey 3-dimensionality in a line drawing.
A clear example of this can be found on the upper arm. The deltoid is a large triangular muscle connecting the upper arm to the shoulder. It overlaps both the biceps in the front and the triceps in the back, both of which emerge from under the deltoid from their points of origin on the upper arm and scapula respectively.
A simple notation of the deltoid’s primacy in this stacking order of muscles can be made by extending it’s contour inside the silhouette of the arm, even if just for a short distance, truncating the contours of the biceps and/or triceps. Such simple adjustments can transform an otherwise flat and “noodley” contour drawing into a solid, 3-dimensional, and anatomically descriptive figure.
3. The Law of Convexity
All contours of the body are convex, meaning they curve outward. Some convexities may be so attenuated that they appear to be almost flat, but they will never, ever scoop inward – they will never be concave.
Moreover, the convex curves will be of a particular type. The high point, or apex of a curve will never appear to be in the center, but will instead be displaced to one side or the other. This asymmetry is the hallmark of trajectory curves, where the rate of curvature changes from end to end. Symmetrical curves, where the apex is in the center – think of a segment of a circle – are called neutral curves, and they are nowhere to be seen on the body. Don’t draw them.
4. The Law of the Space
Prominent convexities on the contour are rarely seen right next to one another. Instead, any two full forms tend to be separated by a flatter “spacer” form, serving as a kind of “rest stop” on the contour. This idea can be seen in subtle ways all over the figure. For example, the two pectoralis muscles of the chest are separated by the flatter form of the sternum between them. Similarly, the iliac crest of the pelvis separates the full forms of the external oblique above and the gluteus medius below.
5. The Law of “Close Hugging”
Huh?
I confess, I didn’t understand this one when Martha first presented to us, but it sank in slowly over the course of a few weeks of drawing in her class.
What the “law of close hugging” refers to is the densely-packed nature of form on the body. There’s a kind of “hierarchy” of structure on the figure, where large underlying forms provide a foundation for other forms on top of them. The influence of those foundational forms can be seen in the overlying structures because what’s on top “hugs close” to what’s underneath.
There is no space, for example, between a bone and the muscle form that attaches to it – they’re tightly fused together, like geological strata… or like the layers of a sandwich pressed together hard in a George Foreman Grill.
It became clear during anatomical drawing class why this law is important. An exercise we repeated often was to make a line drawing of a figure from life, and then draw the ribcage and pelvis (followed by the long bones of the limbs) inside the figure, referring only to our class notes and direct observations of the model. It’s very tricky to do this correctly, especially when you’re still struggling to grasp what these skeletal volumes really look like.
One of the common mistakes that students make is to leave way too much space between the outer contour of the figure, and the inner anatomical structure. The rib cage, for example, doesn’t “float” inside the chest. The rib cage is the chest, with muscle forms densely packed on top of it, radiating in all directions. The large egg-shaped form of the rib cage influences the shape of the torso because all the muscles, fat and skin on top of it conform to it’s shape.
All of it is densely packed together.
If you do leave space between a skeletal volume and the outer contour of the figure – as would be appropriate, say, when drawing the femur inside the thigh – you must be prepared to account for the distance between them. There are very specific muscle forms, in very specific groupings, that fill-up that space all they way to the surface of the skin. The space inside the contour of the figure must be considered the way a bookkeeper works in a ledger – there are no “floating” or “empty” entities. Everything must be accounted for.


I found these 5 “laws” surprisingly helpful in my early days of learning to draw the figure. They helped me make more sense of what I saw on the model, and translate all that complexity into line drawings that were simple, and yet descriptive and natural-looking.
I’m also remembering these laws from a distance of 16 years, while referencing old class notes in my typical, terrible penmanship. If anyone else out there studied with Martha, and has further insight into her 5 laws please let me know.
Give me your take in the comments below.
[convertkit form=4852090]


Great!!!!!!
Thanks for posting David.Very good points.!
Wonderful condensed insights here. Thank you for posting.
Thanks, Richard!
Wow! I just learned more in this post than all my time in art school in Sherman Oaks, CA.!!
Thank you!!
That’s great to hear, Frank! Thanks!
Fantastic post! No matter where an artist is in their career, I think it is so important to revisit these “laws” often. Thank you for putting this list together, I will reference it often!!
Thanks, Alex! At least some of this should sound familiar!
Very clear and very helpful!!!!!!
Wow–so helpful, will have to study these in detail. I think it will take a while.
Its always appreciated to have your insight and hope that you continue to post additional info.
Good stuff!
I use these same laws from Martha in my classes and can still here her in my head telling me which rules I am breaking.
A couple of rules she instilled in me that I add to your list is the use of center lines (never center the center line) and varied curves (there are no neutral curves on the body – one must find the uniqueness of every form).
Thanks for posting.
Thanks for sharing…. a lesson worth gold !
Excellent posting!
Great post! It gives a good reference point to serve as a foundation to go to during the drawing process. I love “rules”, then you’ve got guidelines you maybe don’t strictly adhere to, but without them you have to do either a lot more guessing or learning from your mistakes as you go.
Thanks, Kelli!
Very good instruction–suggestions.
Years ago I took a figure drawing class at the Art Center in Los Angeles.. It was informative. However, I didn’t pursue the art of anatomy. I like the “old” character found in architectural structures and nature.
My reason for joining your web site was because I like your art work, and I am always looking for ways to improve my work. Tyhanks
I remember Martha’s husband Walter teaching some of these laws at the Academy in the late 1980s.
These are great! Thank you for sharing!
I also wrote and shared Martha’s laws in the Fall 2011 issue of Drawing Magazine.
Here are the 6 laws that I still highly value, almost word-for-word from her mouth:
1.Always draw the centerline, all the way through.
2. The centerline is not straight, nor is it an ambiguous curve … it has topography.
3. Do not “over-center” the centerline.
4. The silhouette of the figure is not a continuous, unbroken outline – it has “Overlaps”.
5. There are no concavities in the figure, only convexities.
6. There are no Neutral Curves in the figure, only curves of trajectory.
I hope folks will add these to the list written in the posting!
All Best,
Noah Buchanan.
Thanks for contributing, Noah. I remember Martha’s emphasis on the center line – something she and Deane G. Keller had in common during my time at NYAA. Definitely something worth writing about in a separate post!