Trying Triangulation – A Student’s Experience With a New Measuring Technique
“Drawing is an interrogative process.”
This was one of Deane G. Keller’s mantras while teaching figure drawing at the New York Academy of Art, where I was a student of his in the late 90’s. What he meant was that successful drawing requires us to ask specific questions while we work, and find specific answers using the techniques and tools available to us at the easel. Asking questions, and trying to find answers, is how we can best understand what we see on the model, and on the page. The more questions we ask, the better resolved our drawings will be in the end.
But what kind of questions? Well, anything you can imagine, really. How long is the model’s upper arm relative to the width at the shoulders? How does the position of the left eye relate to the sternal notch along a vertical plumb? How wide is this still life arrangement compared to its height? There are many, many such questions that we can ask ourselves while developing a drawing. Part of our job as artists is to be creative about what questions we ask, and what methods we employ to answer them.
One technique we use a lot here at Vitruvian Studio is called “triangulation” – part of a broader category of “sighting” or “measuring” operations used by artists. Triangulation borrows from a concept from trigonometry, where any two fixed points on the page can be used to find any third by gauging the angles between them. So, for example, if you’re drawing a portrait, and are unsure about where the tip of the model’s nose should be, you can locate it reliably by checking the angle of hypothetical lines connecting the tip of the nose to any 2 other known landmarks.
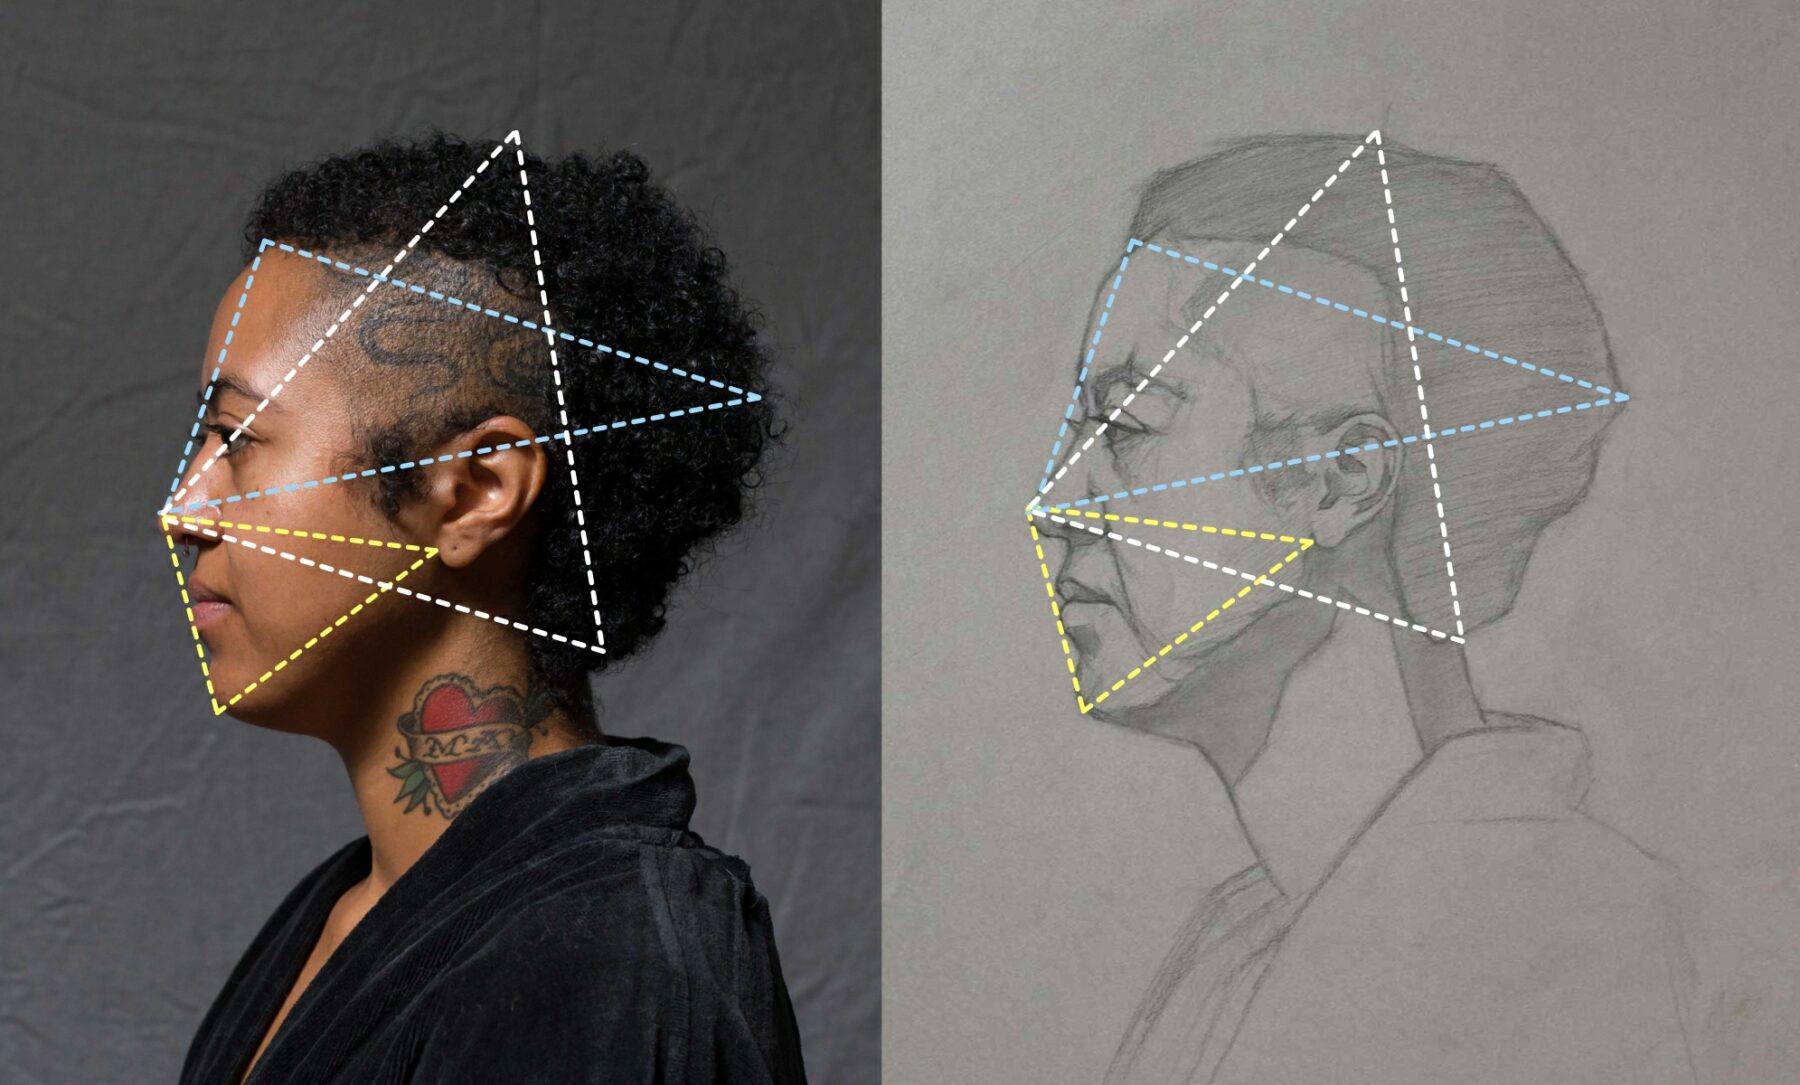
In the example below, I’ve triangulated the position of the tip of the nose in 3 different ways:
- From the top of the head and back of the neck (white lines)
- From back of the hair mass and top of the forehead (blue lines)
- From the edge of the ear, where it meets the jaw, and the bottom of the chin (yellow lines)

In all 3 examples above, the triad of landmarks generate an imaginary triangle that can be reconstructed on the page to derive and confirm the nose's position. When mastered, it’s a powerful technique that allows us to check the position of virtually any landmark, without having to count head lengths, or any other unit of measure.
While it may be a simple concept, that doesn’t mean it’s easy to do – at least, not without some practice. Virtually all sighting techniques employed by artists feel clumsy at first, yielding inconsistent results, but they usually become more comfortable with repetition. Normally, when introducing students to these methods, we advise patience – you’ll gain confidence with it in time. But citing other students’ successes can offer effective encouragement to anyone struggling with a new technique, so we try to do that whenever we can, too.
To that end, we received an email recently from a student who had a breakthrough with triangulation that we wanted to share. Bob Gravlee is a professional designer and illustrator, who sends us updates on his work from time to time. Bob has some serious drawing chops of his own, but he periodically checks-in with our Portrait Drawing recorded course to brush-up on specific skills and concepts. Here’s what Bob told us in his email:
"I purchased your online portrait drawing program a couple of years ago and have benefitted greatly from the blocking in and modeling videos — but I never really tried the sighting and triangulation method you demonstrate.
Well, I finally did it and am so amazed. So I took a photo of my block in drawing done solely with sighting and triangulation (extended arm, sighting and measuring with only my pencil, using angles and plotting key points, etc.) and using Photoshop I overlaid my pencil drawing with the photo of Nicole you provide. Granted it’s not an exact match — I mean the top of the hair, the width of the neck and clothes are off certainly — but the face overall is mostly spot on. Amazing.
The sighting and triangulating you explained has opened my eyes to what is possible if you just — and this will probably sound weird — if you just give yourself permission to slow down and do it.
Thanks so much for your program!"– Bob Gravlee


I love this email because it documents two reactions we encounter frequently with students. First is Bob’s initial reluctance to use triangulation – he “never really tried the sighting and triangulation methods” in the course. Although he doesn't say why, I'm guessing the reason is similar to what we've heard from others: it’s natural to resist trying any technique that, at first glance, may seem strange, uncomfortable, or unnecessarily complicated.
But Bob’s initial hesitation is replaced by a sense of elation after giving the technique a shot. We’ve heard this general sentiment before, too. Once the nickel drops on the concept, students reliably report their amazement that triangulating is both easier, and works better, than they thought it would. In fact, as sighting techniques go, triangulating is remarkably flexible because it isn’t limited to any particular subject. Unlike comparative approaches – like using a head length, or other anatomically-derived unit of measure in figure drawing – triangulation requires no counting, no fractions, and can be used to draw anything. All that’s required is a pair of known points on the page that correspond to identifiable landmarks on the subject. This means it can be employed equally well when drawing a figure, a portrait, a still life arrangement, a plaster cast, a landscape, or anything in between. It's truly universal.
"It should really come as no surprise that a result derived from standing at a distance from your subject, and holding a stick at arms-length from the meat-camera that is the human eye, is actually rather imprecise."
Bob’s email goes further, because he identifies a key insight with respect to all sighting techniques in drawing: they’re approximate. The whole concept of measuring while drawing can hold us back sometimes because it encourages us to obsess over “accuracy”. I’ve seen students become instantly discouraged when their measurements prove to be anything less than perfectly precise. “But I measured it! It has to be right!” is a common retort when I point out an error in a student’s drawing.
But any artists’ measuring technique will only get you so far toward capturing your subject faithfully. Why? Because it’s a crazy way to measure anything. It should really come as no surprise that a result derived from standing at a distance from your subject, and holding a stick at arms-length from the meat-camera that is the human eye, is actually rather imprecise. If you caught the guy you hired to build your new kitchen cabinets measuring wood like that, you’d fire him on the spot. Measuring techniques like triangulation are really only good for getting us close to where things need to be on the page. The rest is up to you – using good, old fashioned judgement – to refine and iterate from there. When Bob points out that parts of his drawing are “not an exact match”, that sounds about right to me. But he also points out the upside: that employing the techniques presented in our courses got him results that are very close to what he was trying to achieve. That’s what a good sighting method can help you to do.
Thanks for sharing, Bob!


I have been drawing for a few years now and first learned of triangulation in one of my early in-studio art classes, and later when I took a couple of online courses through Vitruvian. Like most beginners, I struggled with proportions. To me, and maybe others, getting the porportions right is the most frustrating part of drawing portraits. I felt that triangulation was the best way to get facial features the right size, in the right place and with the correct orientation.
In a previous life, I was a programmer so I thought why not write an app based on triangulation. So I did! The app has two main functions. The first step is to create a “golden triangle” that overlays the reference photo. The three vertices are placed at well-defined points on the photo, e.g. corner of an eye, where the ear connects to the head, button on a shirt… The app then locks in these three points and calculates the angles and lengths of the golden triangle. (The golden triangle is set in stone and the angles and lengths cannot be redefined.) From there only one vertex at a time can be dragged and placed anywhere on the reference photo. This allows me to measure the angle and the distance for any point on the reference photo based on the fixed positions of the other two vertices. (The angles and distances are automatically calculated.) I then use a protractor and a ruler to place the corresponding dot on the drawing. This does take time, so I limit the number of dots to just enough to allow me to create a rough sketch. So for an eye, I might place three or four dots. There is a button on the app to reset the golden triangle to its original default position. This allows moving one of the other vertices in the same way as described above. The second function, releases all the vertices to let me move them anywhere on the drawing to take measurements, either distance or angle, and to compare the drawing to the reference, e.g. distance from pupil to pupil, chin to hairline, corner of mouth to earlobe… This function serves as a check to make sure all the facial features are where they’re suppose to be.
Hope this makes some sense! Thanks.
This is fascinating, Daniel. I love it when high tech and the arts intersect, and this is a great example. I’m also happy to hear when a student employs their own ingenuity and life experience to solve drawing problems in novel ways. I’d be interested to see if your app could provide an assist for getting angles right, even without using the protractor and ruler on the page. In other words, seeing the triangle overlaid on the reference so clearly, it may be easier to “see it” consistently and get better results when trying to just eyeball it on the page. It sounds like that would be fun to play around with…
And sorry for the delayed response on your comment here. Thanks for chiming in!
Thanks for the response. I logged into the Vitruvian site to see about the upcoming live streaming class and saw where you responded to my comment regarding triangulation. I’m thinking about taking the class and I have a couple questions regarding materials for the class. I’ll send them in a separate comment.
Regarding your question about getting the angles right without the protractor is interesting. Using the protractor and ruler for each point does take time. (By point, I mean a pencil mark on the page determined by the angle and distance calculated from the app.) So not using them should speed up the work. I spent about an hour on a sketch using the tool to get the correct angle as done with the typical triangulation method. I haven’t done a freehand sketch in a while, so lessons learned requires a grain of salt.
The first thing I noticed was it’s nice having a straight line (leg of the triangle) to get the correct angle from the reference. I did have to move back and forth from the reference to the sketch several times to make sure the angle was correct or close. This probably isn’t a problem for someone with more experience. After I made my pencil mark, I got to where I almost always used the ruler to check the distance. (The app shows the angle and distance of each leg of the triangle.) This actually took very little time and I think my sketch improved from doing that. I believe it is helpful in getting the angles right since you are actually lining your pencil up with a straight line and not two parts of the reference. For example, you might typically line up the corner of an eye and the bottom of an ear. The app puts a straight line through the eye and ear. The line seems to make getting the correct angle easier. And as a check, with the ability to quickly and accurately measure between two points I think the tool becomes very helpful.
Your question also got me thinking about how to simplify the current way of using a protractor and ruler to create the sketch with the app. Currently, I’m dealing with the protractor, ruler and pencil on every point. I discovered a couple of ways to position the protractor so it can stay in one place to map several points before having to move it. That helped. I now add a light horizontal line across the center of the drawing and tape down the protractor (I truly am a hacker!) on the far left side of the drawing, adding all the points that I need, and then moving it to the right side of the drawing and doing the same. So for any one point I get the angle and distance from the app and I’m only handling the ruler and pencil to place the point in the correct position. This did speed things up quite a bit. I spent a couple of hours working from the same reference as the freehand sketch. It took more time, but I feel that I got better results.
I took pictures of my sketches, if you would like to see them just let me know. The pictures may help the above make a little more sense.